Showing posts with label projects. Show all posts

Thursday, March 29, 2012

Doll Quilt

I'm thinking of doing an hourglass pattern for little A's crib quilt.  So I made S a doll quilt to practice.  You can tell it's a hit if you can't get little hands to stop stealing it when you're trying to take photos.


Yeah, it's not terribly square and the blocks are a bit imperfect.  I'll see if I can improve on that (or if it really bothers me) with the big quilt.


It's finally warm enough to play outside (ish, it's still not very nice), and her chin has met the ground more than once this week.


All done mommy?  Good, I need to put the lens cap down for a nap.


Friday, January 27, 2012

Moses Basket Makeover


This is not a tutorial exactly (as I was too lazy to take photos while I was doing it), but I thought I'd give you a bit of a rundown of how I revamped this basket to help out if you are thinking of doing a similar project.

So with little S I had borrowed a bassinet from my cousin, but I can't for this one as said cousin is also expecting soon!  Of course what I love are moses baskets.  Particularly the really nice modern organic designer moses baskets.  Oh look, that one is $350.  Plus shipping.  To Canada.  Not going to happen!

So I picked this one up for $30 from a lovely lady on our local facebook swap group.  It's a jolly jumper basket on a rocking stand.  It's from 2003 and is obviously not terribly gender neutral.  Also, all the bedding and the rocker seemed a bit big for the basket itself.  Not sure why.  Also it has ruffles.  I don't really do ruffles.  But $30 is pretty awesome.

For this project I used:
- 1 yard cute flannel fabric (it was barely enough)
- 1 metre (yes I buy my fabric in the US and Canada) brown flannel
- 1 metre(ish) unbleached factory cotton (you could use anything, it doesn't show)
- 1 metre nice quilt batting
- 2 things of green ribbon
- wrapping paper

I stripped off all the bedding and the hood and made a pattern for the basket with the wrapping paper.  I made a piece for the bottom of the basket, and one for the sides.  The side piece was half the basket on the inside, I then reused it for the other half and the outside.

Prewash everything.  You don't want it to shrink after you spend all this time fitting it.

Mattresses:
- Using my bottom pattern piece, I cut enough flannel and batting to make 2 mattresses.  So 2 pieces of the brown flannel and 6 of the batting per mattress.  I cut them all with a lot of seam allowance, I should have done even more.


- I layered the mattresses with 3 pieces batting, two of flannel then three pieces batting (think, right sides together).  Then sewed all the layers together around the edge, leaving a hole for turning.  I flipped it right-side-out and ran a few seams across the top to quilt it (so that it would hold together better in the wash) and then hand sewed the hole shut.  I broke a normal machine needle doing the top stitching, and a serger needle when cleaning up the edges. C'est la vie.  Be careful, it's a lot of work for the machines.


Basket Cover


I wanted to have it be soft and comfy but not poofy or sloppy, there are a lot of tutorials for big fat fluffy bumpers for these baskets and that just doesn't strike me as terribly safe.

- I cut one piece of the factory cotton for the bottom.

- For the inner sides I cut 2 pieces of cotton, two of flannel, and two of quilt batting.  One layer of batting was enough to make it soft (so you can't feel the basket through the sides) without being poofy.

- I then layered one each of the cotton, batting and flannel.  I measured where the hole for the handles would be and sewed the edges there first to have a finished hole.  Then I ran some quilting lines up them.  So I had two quilted sides and a one layer bottom.


- I then did a lot of pinning and trimming and sewing together until I had it perfectly fitted to the inside of the basket.  Thus the seam allowance.  I am no expert in these things, so it was good to have some wiggle room.  Because of the shape of my basket, I was very careful to line up the curve where it slopes up at the head when pinning.

- For the outside, I used my side pieces again and cut two pieces of the cute flannel.  These were shorter because I was running out of fabric (plus, they would be shorter anyway), but the important thing was the shape of the top of the piece.  Especially with the way my basket is taller at the head.  I again measured where the hole needed to be for the handles and finished that bit of edge.

- I sewed the outer pieces first to the inner pieces (right sides together) at the top, leaving the hole open for the handles.  Then the two outer pieces together.  These weren't as tightly fitted or I wouldn't have been able to get the cover on and off with the shape of the basket.

-  Then I pinned the bottom edge all the way around the basket to attempt to make it a straight line (it totally was, until I added the elastic later.  Curses) and hemmed the edge.  This was getting a bit awkward to do with the sewing machine...but it worked.

- Once everything fit nicely I finished all the raw edges from the back of the cover, so that it will wash up nicer.  I used the serger till I broke the needle and then used a zig-zag stitch.  Either way is fine, just finish the edges and trim off the excess bulk.


- To make the cover tight while still possible to get on and off, I added a bit of elastic to the seam at each end.


The Base
- The base has a white plastic band around it to hold the basket.  You couldn't see it before because it was covered by gingham ruffles.  It wasn't put together quite right and thus was too big for the basket.  I didn't want the basket sliding around when it was being rocked so I got Craig to unscrew it and make it tighter.
- Then I wrapped the whole band with some pretty green ribbon (I hot glued the ends) to cover the plastic.
So there you go!  Tadah!  I totally think this is as cute as the designer versions.  And I only had to buy the basket, batting,and the ribbon as I had everything else kicking around the sewing room already.  So probably spent about $40 total, although it could probably cost up to $100 depending on your fabric choices.


I'm super happy with it, and glad to make something new just for baby #2!


Thursday, September 29, 2011

Sorry Dora


So I've been looking for a chair for little S for a bit now. I was thinking of finding one of those foam chairs to recover, but when I found this one at the consignment store I thought it was way cuter. Except for Dora. No offense to Dora (well a bit of offense, her eyes are super creepy!) but she doesn't get to live in my living room.


So the padding comes completely off this chair, and has these zippers so that you can take out the foam to wash it. This seemed like a great idea to me, but I was way to lazy to deal with sewing three zippers and two pockets and whatever all else. Therefore, I took the easy was out and simply seam ripped the front section off, used it to make a pattern for a new front, and sewed it onto the existing back. Took me a total of...maybe two hours? Less than her afternoon nap yesterday.


What does little miss Bed Head think?


She loves it of course! Well, she loved it before too...but now I love it too! And I'm pretty proud of myself for not letting it sit around for months or years like I usually do with furniture that I say I will refinish. Maybe if that living room chair had Dora on it, it would be done already?
Wednesday, May 25, 2011

Pillowcase top


So this is another S's third dress sewn up using the Sweet Little Dress pattern by Leila and Ben. I made it the 6 month size because I wanted it to be more of a top. We've started potty training, and little short dresses are easiest at home, and look so cute with shorts or her skinny(ish) jeans when we're out.


I used a thrifted pillowcase I had kicking around. I always thought the print was sweet and it's very soft. Perfect for summer


So she has two in this size now, and I want to make a couple more. I just love how simple and pretty they are. Also easy to make. She took a three hour nap (hooray!) and I made this top from start to finish in that time.

Saturday, April 30, 2011

The littlest Tegan and Sara fan


So I had this t-shirt I got at a Tegan and Sara show a few years back. It honestly never fit me that well to start with (trying shirts on over clothes at a concert is an iffy thing) and now, not at all. Even if I lose all the weight, and more I still think it wouldn't look great on me. But I couldn't get rid of it. I mean...Tegan and Sara! And it was such a fun show!


So naturally I hoarded it for just such an occasion as this. This is the Urban Unisex Hoodie by Heidi & Finn. The back is cut from my t-shirt and the rest is cotton jersey. It was my first time sewing with knits and the most complicated pattern I've sewn. I did make a few mistakes, but none too visible. The pattern was very easy to follow!


So here's my little Tegan and Sara fan. 14 months old! (and eating the dead leaves in the yard...)


In other news...my hair is very short now.

Thursday, April 07, 2011

Pillows!


So I decided that it was time for some new throw cushions in the living room. I wanted something cute and light. Literally light as the cat wasn't matching the black and red cushions very well, so they always looked icky. These are made from a sweet fat quarter of green fishies I had in the stash and some unbleached cotton. I was inspired by this cushion to play with some free-form pintucked pleats. Love how they turned out. Love love love.

2 hours and zero dollars later and I'm much happier in my living room.

By the way, I took these photos on manual...and knew what I was doing. I still have a lot to learn, but I'm crossing off #19 from my list.

Thursday, January 13, 2011

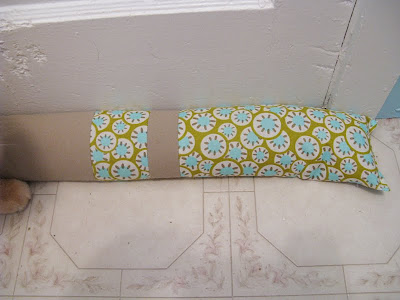
Draft Dodger


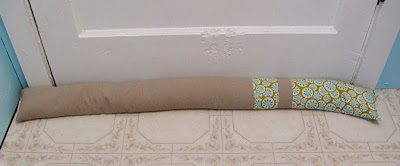
So Our house is old and drafty. This is all well and good in the summer but rather expensive in the winter. So the windows all get the stylish plastic on them and we've had an old towel at the base of the back door to keep the breeze out.


This is much nicer. And took me all of half an hour, I really should have got around to it sooner! It's just a tube of fabric filled with lentils. People use rice or other grains usually, but I happen to have a lot of lentils. Does anyone know who's fabric this is? I bought it in a pile of fat quarters so it has no selvage and I really like it!


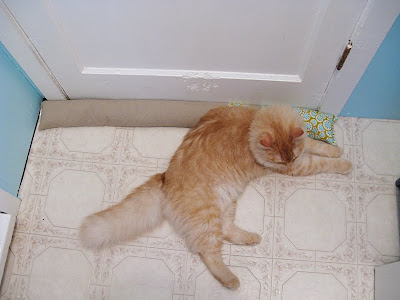
Anytime I get the camera out, Finnegan assumes I'm wanting to take a photo of him. Supermodel kitty.

Monday, January 10, 2011

Rainbow Quilt!


So this is Little S's quilt.
I love all things rainbow for her recently (maybe a rainbow birthday party? No more thinking about birthdays, I'm not ready yet). Also I have a lot of fun fabric in bright colours. Not purple though, turns out.


It was pretty fast once I got going, I started it after Christmas. Quicker because I didn't bind it. I'm lazy like that when it comes to crib quilts. I quilted the top to the batting by stitching in the ditch (which I fully suck at, by the way) then pillow cased it with the flannel and top stitched the edges. To finish I quilted the lines you see on the white area. It is by no means a perfect sewing job, but it's not bad. I'm just not fantastic at straight lines.


It's so sunggly and soft. The backing is flannelette from Sandi Henderson's Ginger Blossom. I was so excited when I found it, I find it hard to find patterened flannel that I like. It's got soft bamboo quilt batting in it.


She slept beautifully last night, so I guess she approves!


And just a couple more baby pictures. Because I can't help myself! I'd love to call that bed head, but she honestly has hair like that all day long.

Saturday, January 01, 2011

Sugar Plum Fairy

My mom made me a ornament ever year when I was little. So for little S's first Christmas I wanted to make something fun. Sugar Plum Fairy! I love the Nutcracker. S mostly wants to eat it. I hope it will make her happy in Christmases to come!

Thursday, December 09, 2010

Wreath

I have a hard time with wreaths. I find that I'm not much into fake greenery these days, but I want a permanent wreath. Most cloth wreaths are a bit on the country side. I am not on the country side. So here is my wreath:

I love it. I followed the directions from here.

I only wish it were bigger, I could only find 8 inch forms in town, not 12. Sad. However it was quicker to make? I love the red felt.


And in other news, I have the best family ever. Here they are watching birds at the feeder. So cute.